


Magellan Echo Stopwatch Feature Tutorial
The Magellan Echo Stopwatch Feature supports the following in an easy to use interface Read below to learn more.
- actions: start, pause, resume, lap split, reset
- data: timer time, current lap/split #, and current lap/split time
NOTE: Echo stopwatch does not store lap/split history or keep a log of timer usage history for review.
How do I Access the Stopwatch Feature?
To access Echo Stopwatch Feature, press and hold any button for 1 second. The watch feature will transition into a menu screen.  Press the top right button to transition into the Stopwatch Feature.
How do I Start, Pause, and Reset the Stopwatch?
To start an activity, press the bottom right or the bottom left button. The activity timer will start.  To pause an activity, press the bottom right button while the activity timer is counting up. Press the bottom right button again to resume the activity timer.
  To reset an activity, first pause the activity timer by pressing the bottom right button. Then press the bottom left button when the stopwatch is paused to reset the activity.
How do I trigger a new lap/split?
While the activity timer is counting, press the bottom left button to trigger a new lap/split.
What do the numbers on the Stopwatch represent?
From left to right, top to bottom.
- The smaller number on the top left is the lap/split counter. It will also show the previous lap/split number for the first 5 seconds after triggering a new lap/split.
- The medium sized number on the top right will show the current lap/split time. It will also show the previous lap/split time for the first 5 seconds after triggering a new lap/split.
- The number in the center is the total timer time (elapsed time minus paused time).
Built for Multisport Athletes
We get it, you do more than run. You bike, you run, you ski, you’re a multisport athlete and need a GPS system for your active lifestyle.
Here in San Francisco, we’re blessed with mild weather and access to mountains, trails and water. As an outdoor athlete, it’s hard to stay focused on a single sport. Plans change with the weather. If it’s sunny – I’m on Mount Tam. If it’s stormy – I’m in Tahoe. If it’s just right – I’m surfing. When developing Switch, we approached the design with this in mind. We wanted to create a single device for all sports. A big part of that is the ability to transition from sport-to-sport, or more importantly, from wrist to bike. For this reason, we created the Multisport Mounting Kit.
The Multisport Mounting Kit is a three part system:
Bike Mount
 The bike mount attaches to your handle bars or stem with rubber bands. The kit includes spare bands and various sizes to ensure a secure fit on any bike. While most users attach the mount to the stem, it can also be mounted to your handle bars. The mount has a cross-hatched back, which makes it compatible with both stems and handlebars.
Wrist Mount
 The wrist mount simply attaches around your wrist like a watch. It uses the same wrist straps that come with the watch. These straps can be moved from the mount to the watch with an included screw driver. I’ll do this when I’m marathon training and off the bike for couple months to achieve a slimmer profile.
Device
Lastly, the brain of the system. Switch and Switch Up move between the mounts with ease. It takes a few tries, but once you get it, it’s old hat. Simply follow these steps:

- Attach the wrist strap to your wrist and bike mount to your bike.
- Snap Switch into the mount by putting the bottom of Switch in first and then push down on the top.
- To remove Switch, hold the sides of the watch(at the top) and pull the top of the watch out of the mount.
Note – there are no buttons to press. Simply grab the sides (at the top) and pull back.
The Multisport Mounting Kit comes with Switch Up, but can also be used with Switch. The kit comes with a screw driver to remove the wrist straps from Switch and attach them to the Wrist Mount. Once removed, you’ll see that Switch and Switch Up have the exact same casing, making both devices compatible with the mounts.
If you’re a multisport athlete that runs and rides, consider the Multisport Mounitng Kit. It will improve your transition times and you’ll be better informed.
How to use Auto Lap
The Auto Lap feature is an easy way to create laps during an activity. Auto Laps are exactly as they sound, ‘Automatic laps occurring at predetermined distance, time, or location.’ They are 100% configurable, you can lap-by-location, time or distance. The most common Auto Lap is every mile. It’s encouraging to know you’ve ticked off another mile, and helpful to see your mile splits.
When an Auto Lap is triggered, Switch beeps, vibrates, and displays the lap time and distance. (Vibrate alerts are only available on Switch Up) Here’s an example of a really short lap:

Set Up
Although some Activity Profiles, like Running, have Auto Lap enabled by default, the lap preference for each Activity Profile can be customized. Follow these steps to set your lap preference:
| 1. Press and hold the Down Button | |
| 2. Select Settings | 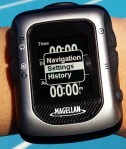 |
| 3. Select Activity Profile |  |
| 4. Select All Profiles |  |
| 5. Select the Activity Profile to be updated |  |
| 6. Scroll down and select Recording Prefs | |
| 7. Ensure Auto lap is enabled. Select Auto Lap and press the Enter button to check the box |  |
| 8. Set the trigger method of the lap. Choose Distance, Time, or Location | |
| 9. Modify the options that appear below to complete your lap preference | |
| 10. When complete, press and hold the Down Button and select Activity |
The Lap preference has been completed for that Activity Profile. If you need to modify another Activity Profile, press Back instead of going back into Activity Mode. Remember to use the Activity Profile corresponding to your lap preferences. You can check whether or not you’re using the correct profile by holding the Up and Down Buttons at the same time. A popup will appear to indicate the active Activity Profile.
Auto Lap is a great way to track progress in segments rather than mining large chunks of data. Next time you’re on a run, ride, or roll, let Auto Lap do the work for you.
What exactly is the Activity Pacer feature?
Overview
The Activity Pacer feature is a unique training and racing tool exclusive to the Magellan Switch series product line. It utilizes a combination of predefined goals, average speed/pace since the start of your activity, as well as current speed/pace to help you achieve your goals and predict your final outcome.
Example
The easiest way to explain the Activity Pacer feature is with an example. Let’s start with a pretty common one, “I would like to run a full marathon in under 4 hours”. It just so happens that’s the default setup for the 3rd Activity Profile named “MRTHN”. Distance is set to 26.2 miles and time is set to 4:00:00 (pace is auto calculated to 9:09/mi). Let’s assume the race starts at 7:00:00 AM and that’s when you begin recording your activity.
Scenario 1: Ahead of Goal, On/Ahead of Target Pace
Let’s say you have run the first 20 miles in 3 hours giving you an average pace of 9:00/mi. Good job, you’re ahead of your goal! Based on your average pace, you are 3:12 and 0.35 mi ahead and your estimated remaining time is 55:48, estimated total time is 3:55:48 and estimated time of arrival is 10:55:48 AM.
You can slow down to a Target Pace of 9:40/mi for the last 6.2 miles and still achieve your original goal. Since you’re Current Pace (9:28/mi) is as fast or faster than your Target Pace, you will achieve your goal if you continue at your current pace. Way to stay on pace!


Scenario 2: Ahead of Goal, Behind Target Pace
Let’s say you have run the first 20 miles in 3 hours giving you an average pace of 9:00/mi. Good job, you’re ahead of your goal! Based on your average pace, you are 3:12 and 0.35 mi ahead and your estimated remaining time is 55:48, estimated total time is 3:55:48 and estimated time of arrival is 10:55:48 AM.
You can slow down to a Target Pace of 9:40/mi for the last 6.2 miles and still achieve your original goal. But since you’re Current Pace (9:52/mi) is slower than your of Target Pace, you will not achieve your goal if you continue at your current pace. Pick it up!

Scenario 3: Behind Goal, On/Ahead of Target Pace
Let’s say you have run the first 20 miles in 3 hours and 6 minutes giving you an average pace of 9:18/mi. You’re a bit behind your goal. Based on your average pace, you are 2:47 and 0.31 mi behind and your estimated remaining time is 57:40, estimated total time is 4:04:40 and estimated time of arrival is 11:03:40 AM.
You must speed up to a Target Pace of 8:42/mi for the last 6.2 miles if you still want to achieve your original goal. But since you’re Current Pace (8:40/mi) is as fast or faster than your Target Pace, you will achieve your goal if you continue at your current pace. Way to pick it up!


Scenario 4: Behind Goal, Behind Target Pace
Let’s say you have run the first 20 miles in 3 hours and 6 minutes giving you an average pace of 9:18/mi. You’re a bit behind your goal. Based on your average pace, you are 2:47 and 0.31 mi behind and your estimated remaining time is 57:40, estimated total time is 4:04:40 and estimated time of arrival is 11:03:40 AM.
You must speed up to a Target Pace of 8:42/mi for the last 6.2 miles if you still want to achieve your original goal. Since you’re Current Pace (9:20/mi) is slower than your Target Pace, you will not achieve your goal if you continue at your current pace. Pick it up!

Configuring Your Goals
The Activity Pacer feature can be enabled/disabled and configured for each Activity Profile. That means you can setup different Activity Profiles, some with the feature enabled, others with it disabled, and different goals for each Activity Profile that has the feature enabled. To access the Activity Pacer configuration, first go to Settings Mode (hold Down button until a Menu appears and select Settings). Then navigate to “Activity Profile > All Profiles > [Activity Profile] > Activity Pacer”. From here you can enable/disable the feature, set what goals to specify, and specify the distance, time and/or speed/pace goals. Make sure you’ve activated the Activity Profile you’ve configured. You can select the Active Activity Profile by navigating to “Activity Profile > Active: [Activity Profile]” and selecting the Activity Profile from the list.
Tracking Your Progress
Head back to Activity Mode (hold Down button until a Menu appears and select Activity). Depending on the goals specified, you will be presented with either 1 or 2 additional data screens (press Up and Down buttons to navigate between available data screens). Begin your activity recording (press the Record/Enter button). The values of the data fields on those additional data screens will constantly update to help you achieve your original goals as well as present you with estimates based on your progress thus far.
When specifying 2 goals instead of just 1 (distance & time, distance & speed/pace, or time & speed/pace), the Activity Pacer feature is able to tell you not only whether you are ahead or behind your specified goals, but more importantly exactly how fast you need to move from now until the end (Target Speed/Pace) in order to achieve your goals as well as your estimated finishing results if you continue moving at the same Average Speed/Pace. The color of the Target Speed/Pace field will inverse if it is slower than the Speed/Pace goal specified/calculated to give you a visual indicator to pick it up if you want to achieve your original goals. The color of the Target Speed/Pace, Time Behind and Distance Behind fields will inverse if your Average Speed/Pace is slower than the Speed/Pace goal specified/calculated to give you a visual indicator you are behind your original goals.
All the Nitty Gritty Details
There is 6 different ways you can setup the Activity Pacer feature depending on the goals you choose to define. The following shows what additional data fields and indicators are displayed based on the goals specified.
- Distance + Time:
- Goals: Specify a distance & time and the speed/pace is automatically calculated. Used to complete an activity of a predetermined distance within a specified time goal. For example, “I would like to run 26.2 miles in 4 hours (9:09/mi pace)”.
- Data Fields: Displays two additional data screens with Current Speed/Pace, Target Speed/Pace, Time Ahead/Behind and Distance Ahead/Behind on one screen and Remaining Distance, Estimated Remaining Time, Estimated Total Time and Estimated Time of Arrival on the other screen.
- Indicators: If your Current Speed/Pace is slower than your Target Speed/Pace, the color of the Current Speed/Pace field will be inversed to alert you to pick it up if you want to achieve your original goals. If you are behind your specified goals based on your Average Speed/Pace, the color of the Target Speed/Pace, Time Behind and Distance Behind fields will be inversed to alert you that you are behind your specified goals.
- Distance + Speed/Pace:
- Goals: Specify a distance & speed/pace and the time is automatically calculated. Used to complete an activity of a predetermined distance within a specified speed/pace goal. For example, “I would like to run 26.2 miles at 9:09/mi pace (4 hours)”.
- Data Fields: Displays two additional data screens with Current Speed/Pace, Target Speed/Pace, Time Ahead/Behind and Distance Ahead/Behind on one screen and Remaining Distance, Estimated Remaining Time, Estimated Total Time and Estimated Time of Arrival on the other screen.
- Indicators: If your Current Speed/Pace is slower than your Target Speed/Pace, the color of the Current Speed/Pace field will be inversed to alert you to pick it up if you want to achieve your original goals. If you are behind your specified goals based on your Average Speed/Pace, the color of the Target Speed/Pace, Time Behind and Distance Behind fields will be inversed to alert you that you are behind your specified goals.
- Time + Speed/Pace:
- Goals: Specify a time and speed/pace and the distance is automatically calculated. Used to complete an activity of a predetermined time with a specified speed/pace goal. For example, “I would like to run 1 hour at 7:30/mi pace (8 miles)”.
- Data Fields: Displays two additional data screens with Current Speed/Pace, Target Speed/Pace, Time Ahead/Behind and Distance Ahead/Behind on one screen and Remaining Time, Time of Arrival, Estimated Remaining Distance and Estimated Total Distance on the other screen.
- Indicators: If your Current Speed/Pace is slower than your Target Speed/Pace, the color of the Current Speed/Pace field will be inversed to alert you to pick it up if you want to achieve your original goals. If you are behind your specified goals based on your Average Speed/Pace, the color of the Target Speed/Pace, Time Behind and Distance Behind fields will be inversed to alert you that you are behind your specified goals.
- Distance:
- Goals: Specify a distance (time and speed/pace are irrelevant). Used to complete an activity of a predetermined distance with no time or speed/pace goal. For example, “I would like to run 8 miles, let’s see how long it takes me.”
- Data Fields: Displays one additional data screen with Remaining Distance, Estimated Remaining Time, Estimated Total Time and Estimated Time of Arrival.
- Indicators: None.
- Time:
- Goals: Specify a time (distance and speed/pace are irrelevant). Used to complete an activity of a predetermined time with no distance or speed/pace goal. For example, “I would like to run for 1 hour, let’s see how far I can go in that time.”
- Data Fields: Displays one additional data screen with Remaining Time, Time of Arrival, Estimated Remaining Distance and Estimated Total Distance.
- Indicators: None.
- Speed/Pace:
- Goals: Specify a speed/pace (distance and time are irrelevant). Used to complete an activity of a predetermined speed/pace with no distance or time. For example, “Let’s see how far and long I can go at 7:30/mi pace.”
- Data Fields: Displays one additional data screen with Current Speed/Pace, Average Speed/Pace, Time Ahead/Behind and Distance Ahead/Behind.
- Indicators: If Average Speed/Pace is slower than your specified Speed/Pace goal, the color of the Average Speed/Pace, Time Behind and Distance Behind fields will be inversed to alert you that you are behind your specified goals.
Take Away
Activity Pacer is a powerful feature that can help you achieve your training and race goals. Don’t let this comprehensive explanation scare you. Once you use Activity Pacer, you’ll see that it’s easy to set up and intuitive to use. You’ll no longer have to burn calories doing math in your head and you can re-purpose that energy to achieving your personal bests!
Have a question? Leave a comment or ping us on Facebook, Twitter, or Google+.

